
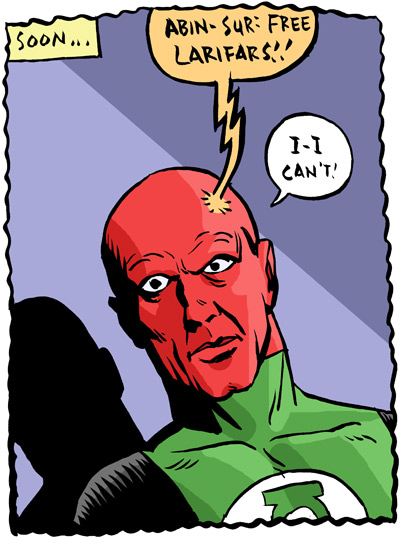
Doin' some sketches this morning, and I thought I'd draw Abin Sur (Oh YOU know, Abin Sur, the former Green Lantern of sector 2814 who, as he lay dying, gave his ring to ace test pilot Hal Jordan, the SILVER AGE Green Lantern? Of course, you say. Of course).
This is from a panel from Green Lantern #16 (1962), drawn by Gil Kane and Joe Giella. It was written by John Broome, too, but I didn't faithfully recreate the dialogue. Or even paraphrase it accurately. So it goes.
The big news is that I colored this with the help of a flatting plugin for Photoshop. Flatting is the process of selecting individual areas in a picture so that you can color them in. It's time-consuming and not terribly creative, and most colorists farm it out to other people who can do it quickly. And the thing about flatting is that the whole time you're doing it, you think to yourself, "Shouldn't there be a computer program that does this for me?" I always thought the answer was no, but it's heck yes.
So here's what you do: Download the two plugins, "Multifill" and "Flatten" from Boudewijn Pelt's website, decompress them, and put them into your plugin folder that's wherever Photoshop is on your hard drive. Then:
1. get your bitmap art to where you want it (with hard edges, no grays or antialiasing).
2. make file RGB or CMYK (however you like it) and make 2 identical layers of the lineart.
3. run "Multifill" on one layer, which will fill all the white spaces with different colors.
4. run "Flatten" on that same layer, which will extend all colors toward each other and eliminate the black on that layer.
5. Voila! Black on one layer, color on another!
A little preemptive troubleshooting:
1. One problem with step 4 sometimes is that the colors will be so dark that "Flatten" reads them as black, and eliminates them. If you select the lineart, then inverse the selection (selecting all the colors) and lighten them, you won't have that problem.
2. The program is (obviously) very literal, so a) any areas that are left open (my characters' eyes always have this issue) are colored the same color as the area around them, and b) any areas that are crosshatched or textured in pen or brush will be a maelstrom of horrible websafe blobs. In either case, you'll need to do a little touching up here and there to get things the way you want it, but the time you save will be unbelievable.
Enjoy!
10 comments:
Yaaaawwwwnnnnnn...
I find this to be very useful. Thank you for bringing these plug-ins to my attention.
Apparently my Mom is a black and white comics afficianado.
Hey Shad's Mom-- there are approximately 12 billion other websites on the internet. Please check those if you're bored.
And anonymous-- you're welcome.
I think everything should be airbrushed.
Hey cool, thanks.
Oh come on Zander! To a non-techie, this was like reading stereo instructions (and I've been in my house for 4 months and STILL don't have the stereo hooked up which should explain something!) I like looking at your drawings, I just can't stay awake when you describe how you draw them. Truce?
Gene is very excited!
Zander, thanks for telling me about these plug-ins!!! I had a great time at the Conspiracy, by the way (even though I was dead-tired). You guys rock.
Cedric
GIMP the free Photoshop also has the tool, especially developed at the request of a comic artist.
http://registry.gimp.org/node/14051
Post a Comment